
Tutorial: Bamboo ➕ NDepend => How to integrate them together
This tutorial is intended to help you to integrate NDepend within your current builds or your new builds. In cases you missed it, NDepend is a tool in order to validate your dependencies within your project. You can look at the previous post on HoNoSoFt (French). The topic of this tutorial will be discussing about are the following:
What is Bamboo?
Quickly speaking, Bamboo is the Build server from Atlassian in it’s CI stack. It is often used with the integration of BitBucket and it also offer the possibilities to connect to any other repositories (GitHub included). Bamboo itself allow you to create build project, deployment strategy, interconnection with other Atlassian tools or even send automatically a message with the build status to your #Slack channels. If you already played with Jenkins, AppVeyor or GitLab, you should be already familiar with the daily usage of such a tool. In order to get more details on Bamboo, please follow this link, it will give a full details on Bamboo.
Pre-Requisites
- Bamboo Server (or Agent) in Windows. In case you need to install a new instance, click here to download Bamboo.
- It is mandatory to use or install the JDK 1.8 (Or JRE also seems to works) in a folder without any spaces. Any version greater than 8 won’t be working. This is supposed to become supported in the future.
- If you run a test server locally in order to look how it works, it will be accessible on http://localhost:8085/
- During the first time wizard a key will be required for activation (30 days or real license). To obtain a 30 days license, go into your Atlassian space or simply use this link in order to request the evaluation license for your account
- NDepend Build license or Trial active on the build machine (or your current machine, if you run Bamboo locally)
- PowerShell is not mandatory, but you will see later that it is a must in case you want to have a proper build without failure
Bamboo – Add NDepend Capability
What is a capability in Bamboo
In Bamboo, in order to be able to use any build related tools, you should normally set it for each agent in order to add a specific capabilities. In this case, we will be adding the NDepend capability to a Windows agent. That capability will be pointing to the NDepend.Console.exe coming from the NDepend package previously installed/downloaded. Don’t forget to launch it at least once in order to trigger the license. The details are available in the documentation. In my case, it is installed into [D:\Ndepend\NDepend_2018.2.1.9119]. I prefer to keep the version within the folder name. This is easy to know if my agent is using the proper version of the tool. This capability, if I change the executable folder will affect automatically all the build that was using this capability. It will not, in any cases, re-trigger an automatic build. The variable will then be re-applied starting from the next build.
It is common to keep those capabilities or executable in that screen. It regroup all your agent(s) features. More details on this feature can be found on the Atlassian website.
⚠Be aware: The capabilities displays dependencies with existing builds. That being said, if a capability variable is used within a script, you won’t see anywhere that as an active dependency. For that reason, you are required, in case of multiple agents, to specify manually what Agent should be used for your build stage.
Go to your agent configuration
- Click on the cog (options wheel);
- Select Agents;
- This will make you jump in the administration panel directly on the Agents build resources;
- Select your any of your Windows build Agent by simply clicking it.

Agent summary
- Validate that your agent name is valid;
- Go within the Capabilities tab;
- Click on the Add capability link button.

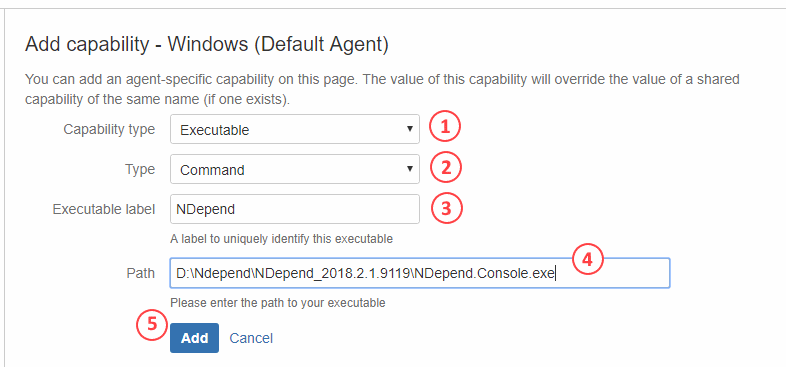
Adding the capability
- Capability type: Executable
- Type: Command
- Executable label: NDepend
- Path: [D:\Ndepend\NDepend_2018.2.1.9119\NDepend.Console.exe]
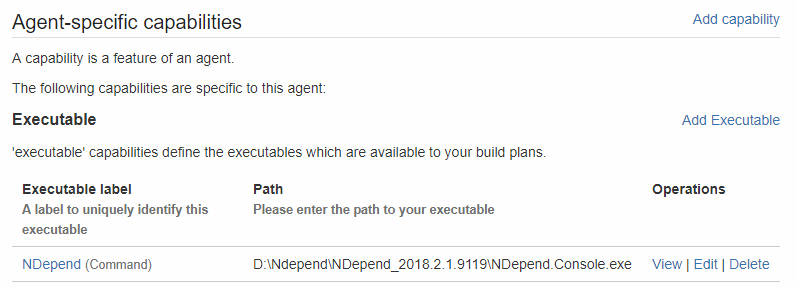
See the Agent specific capabilities
As you can see, after doing the previous steps, you will have your Agent specific capability added. Now, we can use that capability during our build.
Bamboo Build configuration – Capabilities (Easy)
Let’s consider you have your build already existing and that you want to add the NDepend console command. In the current tutorial bellow I will be taking a simple Dotnet Core 2.1 solution. The build will be named IdentityServer4.LdapExtension (GitHub project), where you would have your Git repository, NDepend project and your basic build already configured (checkout and build).
Add a new task to your build stage
- Ensure you are in the configuration of your project;
- Go to your build job where you usually run your tests and everything else;
- Within the tasks, you will find all the detail of your current job;
- Add a new task.

Once the popup show,
- Search for Command in the search box;
- Select Command by clicking it.

Let’s configure the command
- The new command task should be already displayed;
- The description of the task, in this case: NDepend;
- Select the executable you created for your agent capability: NDepend;
- Enter the argument to the full path of your NDPROJ and override the indirs/outdirs parameters, see the Jenkins article for more details. Those path can be relative if you configured your project accordingly, otherwise it will be the full path. In case you don’t set those path properly, NDepend is not able to find your PDB’s files and consequently, do a proper analysis.
- Example:
${bamboo.build.working.directory}/IdentityServer.LdapExtension.ndproj. You can add a “/silent” is if you don’t want to see all the output logs from NDepend, but I strongly not advise to do this within a build simply because you might need to debug using the logs one day. The indirs/outdirs are omitted considering you have pre-configured your project with relative path instead of the default full path.
- Example:
- Save your configuration

Build your new configuration
I recommend to always build after doing modification. That way it’s easy to see if you caused the build to fail for a real reason (configuration) or if it’s due to code change (triggered builds).
In the case of NDepend, it’s execution returns an exit code. Be aware, the exit code will make your build fails if there’s any quality gate errors. You can read the following when executing the console application:
Notice that NDepend.Console.exe returns a non-zero exit code when at least one Quality Gate fails. This exit code can be used to eventually stop your build process in such situation.
The report, even on failure, will exists, however the build will be red and your artifact will probably not be even available. Since there’s no “/ErrorLevel” custom configuration for the exit code, then you will have to do differently in order to ignore those errors.
- Option 1: Ignore the errors by adding the special tags from NDepend within your code.
- In that case, simply add the NDepend ignore attributes where required and re-launch a build after your commit.
- Option 2: Use a script instead of a command in order to control your flow completely and to continue even if there’s a quality gate issue
- This is the topic of the next section
Bamboo Build configuration – PowerShell Script (Complex)
As stated previously, this is more for those who already have a project having no big issue which cause a quality gate to fail, or if you want to have the Quality Gate failed but still want to generate the reports.
Don’t get me wrong, the Capability created was not for nothing, however, the only drawback in this case is that the Capability will not be detecting our build dependency to NDepend.
In this case, instead of creating a command, we will be creating a script (or add to current Dotnet Core build script)
- Go in your Build configuration, default stage (or specific one) and click on Add task;
- Select the Script type;
- Enter the description and select Windows PowerShell as the Interpreter;
- In this case, we will be using the Inline type instead of a PS1 shell script. This option will create automatically a shell script behind the scene. After, simply re-write the code-snippet bellow the image.
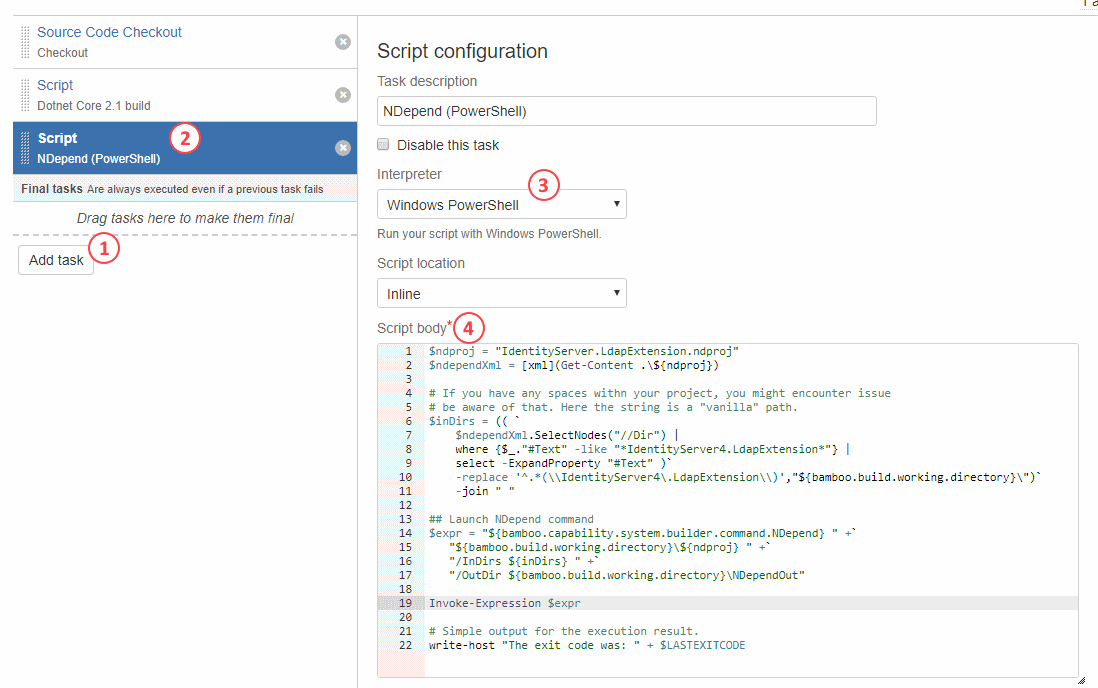
The PowerShell is using the existing NDproj (XML file) and then replace the InDirs by the current build path in the command line. This is for your NDproj file that you wouldn’t have any relative path. Once this is completed, it will create the final command and execute it (Invoke-Expression). Here’s the PowerShell script used in the above picture.
# NDProj should normally be a variable in the build, the same goes for other parts. That way
# you can use a build script instead of inline, and that build script can be part of your build
# repository.
$ndproj = "IdentityServer.LdapExtension.ndproj"

# Load the NDepend XML project file.
$ndependXml = [xml](Get-Content .\${ndproj})

# If you have any spaces withn your project, you might encounter issue
# be aware of that. Here the string is a "vanilla" path.
$inDirs = (( `
    $ndependXml.SelectNodes("//Dir") |
    where {$_."#Text" -like "*IdentityServer4.LdapExtension*"} |
    select -ExpandProperty "#Text" )`
    -replace '^.*(\\IdentityServer4\.LdapExtension\\)',"${bamboo.build.working.directory}\")`
    -join " "

## Launch NDepend command
$expr = "${bamboo.capability.system.builder.command.NDepend} " +`
   "${bamboo.build.working.directory}\${ndproj} " +`
   "/InDirs ${inDirs} " +`
   "/OutDir ${bamboo.build.working.directory}\NDependOut"

Invoke-Expression $expr

# Simple output for the execution result.
write-host "The exit code was: ${LASTEXITCODE}"
Generate the NDepend Artifact
Now, you should be able to build and have the NDepend output folder. In this demo, we have NDependOut as the folder. Todo so, we will have to add the artifact configuration. Please, go back in the Build configuration and your default stage where you have the NDepend script. Once this is complete, select the Artifacts tab and click on Create artifact button.
The fields to input are:
- Name: NDepend
- Location: NDependOut
- Copy pattern: **/*
Once this is completed, you should be able to re-build your project and see if your build artifact is there. Note that if you want to have comparisons between your builds, you could re-use the shared artifact. This is a bit more complex, but it’s possible and it won’t be explored in this tutorial. Let’s say that you could simply avoid cleaning up the build folder every new build. I don’t suggest to do that, but it’s something that could work out.
For example, we have the following successful build:
- Green build = success
- Go in your artifacts of your build
- Click on the artifact name that interest you (NDepend in this case)

Once the artifact will open, it will show the content of the ZIP file. Simply click on the file NDependReport.html. This will then open a link that looks like: http://localhost:8085/artifact/I4E-ID/shared/build-19/NDepend/NDependReport.html#Main
Your page should look similar to this (It depends actually on your project):

Conclusion
Thank you for reading, and I hope it helped you configure your build! If you wish to also integrate with SonarQube, you also can. You simply have to do what is proposed in SonarQube integration with NDepend article and in your Bamboo script, where you build your Dotnet project, you add the NDepend Sonar Runner. The result can then be seen after your build directly within SonarQube. Don’t forget that you might want to install some Marketplace plugin in Bamboo for Sonar in order to send the data. In case you don’t want to use a plugin, don’t worry, it is also possible.