
Ldap + Identity Server Series ー Part I ー OpenLdap on docker container
Objectives
This is a multi-part tutorial playground in order to build, for dev or for some of your needs, an integration of:
- [Part I*] OpenLdap (Or active directory) using Contoso Users
- [Part II] IdentityServer 4 with OpenLdap (Built in Dotnet Core 2.x)
- Option of using Redis to persist user cache (tokens)
- [Part III] Docker to run the previous two options all together (If not already explained in previous 2)
- [Part IV] A small back-end with protected Api’s
- One in Dotnet Core 2 using the WebApi format
- One in NodeJS
- [Part V] A small front-end to call the Api’s
- One in Dotnet Core 2 using the WebApp MVC format
- One in NodeJS
Requirements for this part
- Docker (Windows, Linux or Mac)
Let’s begin [Part I]
In this part, if you are using Active Directory, it will be easy to already find a VM having the Contoso users already within Active Directory. However, if you are using OpenLdap, you won’t find anything. For development purpose it’s nice to have an already populated Ldap database. For some reason, I will stay with the default schema from OpenLdap. The schema differ from Active Directory.
In this part we will cover:
- How to create an empty OpenLdap Server
- How to start the Server
- How to convert a csv file to ldif format
- How to import within OpenLdap Server
- How to see the data (tool)
How to create an empty OpenLdap Server
You have the choice here of reading all the documentation to install step-by-step or speed up by using a Docker image. For a production environment I would strongly suggest to read all the documentation regarding OpenLdap. It will helps to avoid security holes and also to build properly your Ldap tree.
Let’s pull the best image I’ve found so far for OpenLdap (osixia/openldap)
$ docker pull osixia/openldap:latest
The download should be pretty quick since the image size is not so big. At the time of writing this, the image size on the disk was about `222 MB`. The Github site from that image help you to configure it and also indicate how to have persistance and so much more. Let’s do a quick `Contoso` configuration:
Create an OpenLdap environment file
This file will basically set the Base DC and Admin/Config/Read-Only & {user} + {password}.
- File: ./ldap.env
LDAP_ORGANISATION=Contoso Ltd.
LDAP_DOMAIN=contoso.com
LDAP_ADMIN_PASSWORD=P@ss1W0Rd!
LDAP_CONFIG_PASSWORD=P@ss1W0Rd!

LDAP_READONLY_USER=true
LDAP_READONLY_USER_USERNAME=ldap-ro
LDAP_READONLY_USER_PASSWORD=P@ss1W0Rd!
- Create a folder to put shared files within Docker and OpenLdap
- ./ldap/
Create a docker compose file
The docker-compose file will be useful to start/restart or reconfigure the image. I prefer the docker-compose version to the all-in-one command line ( docker run ... ). It is still up to you! 😉
File ./docker-compose.yml
ldap:
   container_name: contosoOpenLdap
   image: osixia/openldap:latest
   ports:
     - "389:389"
     - "636:636"
   env_file:
     - ./ldap.env
   volumes:
     - ./ldap:/data/ldif
How to start the Server
Within the directory where you have the docker-compose.yml file, you should be able to use docker-compose executable (if in windows) or if you are on Linux you might have to also install that package.
$ docker-compose start
- This will be starting the server. If you prefer to see all the log within the screen, you can instead use
docker-compose upcommand.
How to convert a csv file to ldif format
First of, what is a ldif file? Easy reading on Wikipedia. Basically, it is a Ldap Data Interchange Format. It gives the possibility to add, remove, modify (by properties if we want) or even delete using a specific text format. The format in itself is not complex, the issue you will encounter is that the attributes might not be defined (OpenLdap VS Active Directory). By example the sAMAccount exists in Active Directory and in OpenLdap it might be the uid attribute, depending on your organization.
I have created a simple project named csv2ldif (far from perfect) that can quickly convert a simple CSV format into a ldif format with a default password of P@ss1W0Rd! (Yes again, let’s keep it simple). If you want to change the default password, please do, it’s not so much work. You can also contribute to the repository. It will generate basically 2 files. The first one will be about creating the user groups. The second one is about creating the user and then assigning them to the group. In that project you can also find the CSV file regarding the Contoso Users (with also the pre-generated demo in the example folder).
Regarding the LDIF generation, you can find good information on the LdapWiki.
Small peek (Raw csv)
dn,objectClass,uid,homeDirectory,group,givenName,sn,displayName,cn,mail,manager,telephoneNumber,title
cn=Dan Jump,inetOrgPerson;person;organizationalPerson;posixAccount;top,danj,/home/danj,Executive,Dan,Jump,Dan Jump,Dan Jump,danj@contoso.com,,(425) 555-0179,CEO
cn=Adam Barr,inetOrgPerson;person;organizationalPerson;posixAccount;top,adamb,/home/adamb,Operations,Adam,Barr,Adam Barr,Adam Barr,adamb@contoso.com,cn=Dan Jump,(206) 555-5472,General Manager of Professional Services
Note that the Base OU for the
groupsandusersare not generated. Usually you already have this in your tree. In our case we have something empty.
Create the groups and users OU using a LDIF file
dn: ou=users, dc=contoso,dc=com
ou: users
description: All people in organisation
objectclass: organizationalunit

dn: ou=groups, dc=contoso,dc=com
ou: groups
description: All Groups in organisation
objectclass: organizationalunit
Small peek (Generated groups LDIF)
dn: cn=Executive,ou=groups,dc=contoso,dc=com
objectClass: groupOfUniqueNames
cn: Executive
uniqueMember: cn=Executive,ou=groups,dc=contoso,dc=com
description: Executive

dn: cn=Operations,ou=groups,dc=contoso,dc=com
objectClass: groupOfUniqueNames
cn: Operations
uniqueMember: cn=Operations,ou=groups,dc=contoso,dc=com
description: Operations
Small peek (Generated users LDIF)
dn: cn=Dan Jump,ou=users,dc=contoso,dc=com
objectClass: inetOrgPerson
objectClass: person
objectClass: organizationalPerson
objectClass: posixAccount
objectClass: top
uid: danj
uidNumber: 70000
gidNumber: 70001
homeDirectory: /home/danj
givenName: Dan
sn: Jump
displayName: Dan Jump
cn: Dan Jump
mail: danj@contoso.com
telephoneNumber: (425) 555-0179
title: CEO
userPassword: {SHA}RKkNn7+KoG94IN3x/B2jnm/4DS0=

dn: cn=Executive,ou=groups,dc=contoso,dc=com
changetype: modify
add: uniqueMember
uniqueMember: cn=Dan Jump,ou=users,dc=contoso,dc=com

dn: cn=Adam Barr,ou=users,dc=contoso,dc=com
objectClass: inetOrgPerson
objectClass: person
objectClass: organizationalPerson
objectClass: posixAccount
objectClass: top
uid: adamb
uidNumber: 70002
gidNumber: 70003
homeDirectory: /home/adamb
givenName: Adam
sn: Barr
displayName: Adam Barr
cn: Adam Barr
mail: adamb@contoso.com
manager: cn=Dan Jump,ou=users,dc=contoso,dc=com
telephoneNumber: (206) 555-5472
title: General Manager of Professional Services
userPassword: {SHA}RKkNn7+KoG94IN3x/B2jnm/4DS0=

dn: cn=Operations,ou=groups,dc=contoso,dc=com
changetype: modify
add: uniqueMember
uniqueMember: cn=Adam Barr,ou=users,dc=contoso,dc=com
If you want the entire data don’t forget to just go on https://github.com/Nordes/Csv2Ldif/tree/master/example. There’s the 00, 01, 02 sample file where it have the entire Contoso setup.
How to import within OpenLdap Server
Right now, we have an empty OpenLdap Server. What we want is a server with some users and groups in order for us to play with them within an application or during our Devs.
Download the following files (if not already) and save them within the ./ldap/ folder you’ve created earlier:
- 00-startup.ldif
- Create the
usersandgroupsOU (Organisation Unit) (ou=…,dc=contoso,dc=com)
- Create the
- 01-output-groups.ldif
- Create all the
groupsCN within thegroupsOU (cn=…,ou=groups,dc=contoso,dc=com)
- Create all the
- [02-output-users.ldif](https://github.com/Nordes/Csv2Ldif/blob/master/example/02-output-users.ldif)
- Create all the
usersCN within theusersOU (cn=…,ou=users,dc=contoso,dc=com) - Attach all the
usersto their pre-definedgroup. In our case it’s a 1-1 match.
- Create all the
Import
It’s now time to launch the command line tool (if possible where you have your ldif file).
Our action parameter will be using the following:
- -f: Import the file launching the
ldapmodifycommand within the container - -d: Use the administrator role to import
- -w: The administrator password (if not set, but with the -w option, it will request the password). In case the password is not set, it will fail.
- -c: Continue on failure (we never know, but at least it will give the logs)
- …: The other one are trivial.
The output result when launching the command are describing what’s happening. By example
...
adding new entry "cn=Josh Edwards,ou=users,dc=contoso,dc=com"
modifying entry "cn=Sales,ou=groups,dc=contoso,dc=com"
...
If you are too lazy to type the commands, you can copy the batch file located at the same emplacement as the 3 previous downloads
Organisation Units
PowerShell uses the back tick ` for multiline, however on linux it will be \ character.
$ docker exec contosoOpenLdap ldapmodify \
-a -x -h localhost -p 389 \
-D "cn=admin,dc=contoso,dc=com" \
-f /data/ldif/00-startup.ldif \
-w P@ss1W0Rd! \
-c
Groups
$ docker exec contosoOpenLdap ldapmodify \
-a -x -h localhost -p 389 \
-D "cn=admin,dc=contoso,dc=com" \
-f /data/ldif/01-output-groups.ldif \
-w P@ss1W0Rd! \
-c
Users and membership
$ docker exec contosoOpenLdap ldapmodify \
-a -x -h localhost -p 389 \
-D "cn=admin,dc=contoso,dc=com" \
-f /data/ldif/02-output-users.ldif \
-w P@ss1W0Rd! \
-c
How to see the data (tool)
You have some choice here, but since I am not a big fan of doing the query all by hand and do the request through the OpenLdap Docker instance, I prefer to use LdapAdmin. It gives a UI which is easy to play with.
When creating a connection you will need to set the following:
| What | Value | Desc. |
|---|---|---|
| Connection Name | OpenLdap Contoso Test |
Name of the connection (can be what you want) |
| Host | localhost |
Since we’re running thing locally, localhost is good |
| port | 389 |
Default port (unsecured). The secured is supposed to be also available. |
| base | dc=contoso,dc=com |
Base DC when opening the connection |
| Auth type | Simple Authentication |
Option under the base |
| Username | cn=admin,dc=contoso,dc=com |
User to connect with (let’s use Admin, but you can also use the ldap-ro or other user) |
| Password | P@ss1W0Rd! |
Admin password in this case |
Look After Import
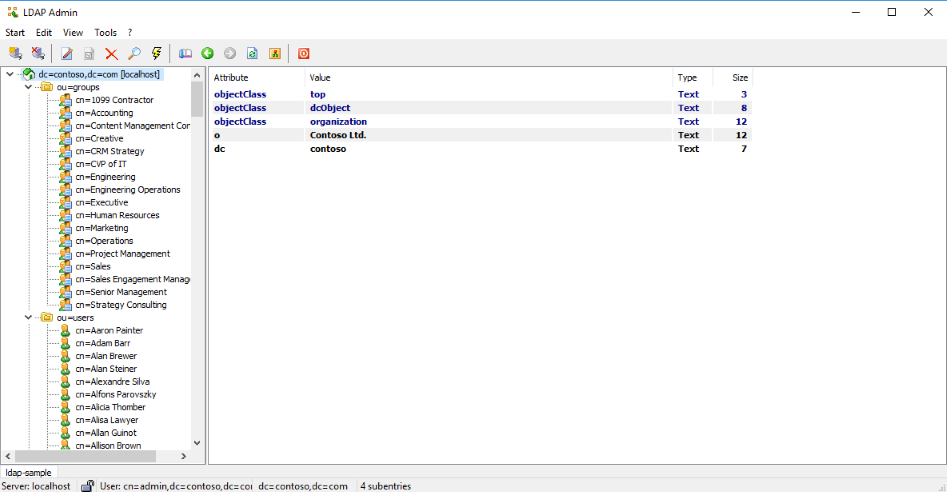
ldap-Imported
The end! See you soon for the next part.
Great post! It’s very helpful
I would appreciate the next articles of the multi-part tutorial
Thank you
Thank’s for the reply. I have not much time recently ;). But I’ll try to make a follow-up. It’s been quite a while since I wrote that article and I lost my local VM’s since then.
This was very helpful.
Thank you.
thank you, it was useful.
You’re welcome.
Great Post!
Any sample for using it from API using JWT?
Hi Vayth, I do, but not publicly. Actually the project was a PoC that I tried on small scaled project internally. For the big implementation, it was done a bit differently, however, it works like a charm.
Right now, I am quite busy and that’s also why I don’t update so much the blog/github repo. If I am able to find some time soon, I’ll try to post some updates.
Thank’s for your message.
thank you, it was useful.
Thanks it was great. Is there any other part?
Hi,
No, sorry. I didn’t have much time recently. Maybe in the future.
good guide, but it would be nice to explain how to add integration with pqchecker with ppolicy.
Merci beaucoup! tres bien explication!
où sont les otres chapitres?
Je suis plutot occupé ces derniers temps avec mon boulot. Je vais tenter de travailler là dessus lors de mon changement de compagnie.
Aussi, à noter que la librarie à aussi évolué un peu avec le temps et que désormais il est possible de se connecter à plusieurs AD au même moment.